Characters & Outfits
The most popular mods are the ones where you modify existing characters. Everyone wants to make Queen's boobs bigger, now you can! Character assets are heavily reliant on file name and file paths. Character assets are also reliant on things called atlas files, but follow this guide, and you'll understand what to do.
warning
Please read this guide thoroughly and do not skip parts!
Download Assets
You can find .psd files for all characters here.
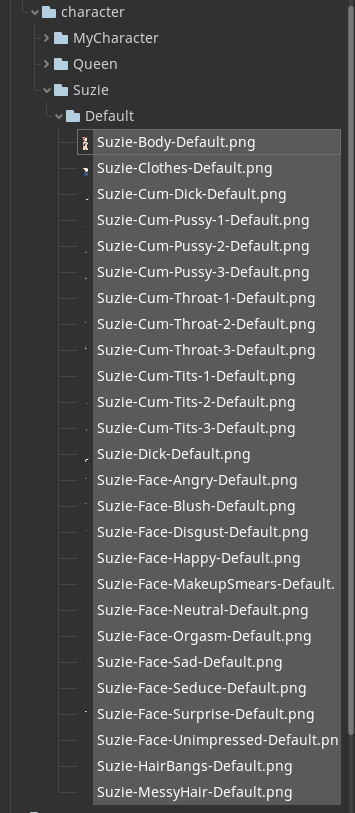
Layer Structure
Queen's Brothel characters have a very strict structure and naming scheme. If you mess this part up, your mod will not work. Fortunately for you, I've created an app to help you export your characters from your .psd file. Below is the layer structure:
* {OUTFIT_ID}
  * Variants
      * Default
  * Cum
      * Pussy
          * 3
          * 2
          * 1
      * Chest
          * 3
          * 2
          * 1
      * Face
          * 3
          * 2
          * 1
  * Messy Hair
  * Dick
      * Cum
      * Dick
  * Hair Bangs
  * Faces
      * Seduce
      * Unimpressed
      * Disgust
      * Orgasm
      * Surprise
      * Angry
      * Sad
      * Happy
      * Neutral
  * Makeup Smears
  * Blush
  * Body
Every character must follow this layer structure. You are able to add any amount of variants you want in the Variants
layer group, but there must be one named Default. You are allowed to leave layers blank, if you do not need them, for
example the Hair Bangs layer.
Modify Existing Character
Create New Outfit
Let's make an outfit for Queen. Download the Queen .psd file from here.
- Select the
Defaultlayer group and make a duplicate of it (Ctrl + J in Photoshop) - Rename the new layer group to
Tutorial - Click the
Tutorial/Variants/Defaultlayer - Use the brush tool to scribble over Queen's body
- Create a new layer next to
Tutorial/Variants/Defaultand name itMyVariant - Hide the
Tutorial/Variants/Defaultlayer - Click your new
Tutorial/Variants/MyVariantlayer - Use the brush tool to scribble over Queen's body
The steps above will create a new outfit named Tutorial with two variants, the default one and one named MyVariant.
You are not allowed to change the name of Default, but you are able to change the name of any other variants.
warning
Variant names must not have special characters or spaces. Treat them like IDs.
- Save your .psd
- Use the Character Tool to export your character assets
- Follow the instructions here to copy your assets into your mod files
Now that we have our assets into our mod file system, we can tell Queen's Brothel that our outfit exists.
- Open
res://mods/{MOD_ID}/init.gd - Add an
addOutfitfunctionQB.character.getCharacter("Queen").addOutfit("Tutorial", "My Outfit", "A nice looking outfit!", true)
The code above will put our new outfit in the game and will unlock it by default, so you can boot up the game and find it in your house without having to buy it from Cassie's shop.
Create New Character
We recommend copying an existing .psd to start. Download the Queen .psd file
from here. For this example, we're going to assume your character's ID is Suzie.
PSD File
Erase every layer in the Default layer group before getting started. You don't want to accidentally have lingering
Queen assets in there.
There are many layers that you will need to create. You have existing .psd files to use as reference for your characters.
After you are done creating your character .psd file, you must save the .psd file as the ID of your character. For
example, if you are going to set the ID of your character to Suzie then your .psd file must be named Suzie.psd.
Follow the instructions here to copy your assets into your mod files.
Create Character Script
Now that we have our character's assets into the game, we can tell Queen's Brothel that our character exists.
Create a new .gd script file in res://characters/ with the ID of your character. res://characters/Suzie.gd
Initialize your Character script with this script:
extends Character


func _init().("Suzie", "Suzie"):
    pass
If you want your character to always have a dick, you can set the dick to true
using setDick(true).
- Open the
res://mods/{MOD_ID}/init.gdscript - Add an
addCharacterfunctionQB.character.addCharacter('Suzie')
Add Assets Into Game
This part is important. Make sure you follow these instructions carefully.
- Extract character assets using the Character Tool
- Move character folders to
res://assets/dialogue/character- Example:
res://assets/dialogue/character/Queen
- Example:
The character tool will create an Outfits folder in the output directory that will have previews for your outfits.
These files are important for main characters, not NPCs. If you are making an outfit for an NPC, you can delete
those preview files.
If you are creating an outfit for a main character:
- Move the
Outfitsfolder tores://assets/dialogue- Example:
res://assets/dialogue/Outfits
- Example:
Atlas File
Now, we have to create an atlas file for your character outfit. Atlas files help increase performance and are mandatory to keep low memory usage.
info
Queen's Brothel characters have a minimum of 27 layers. Each layer is 1000x1080. A 1000x1080 texture is 4.11mb in RAM. 27 layers would mean it costs 111mb to display a character on the screen. If we were to load 10 characters for a dialogue scene, that would cost 1.1gb of RAM.
Atlas files shrink our 27+ layers into one file. It does this by removing all transparency from your file and then telling the engine how to display the image when it is called. Meaning, we just turned 27 images into 1 and are now loading one ~8mb file.
- To create an atlas file, select your outfit's assets in the Godot FileSystem.
- In the top left of the Godot engine click the
Importtab - Select
TextureAtlas - Click the folder icon next to
Atlas Fileand save your atlas inres://assets/dialogue/Atlases- For best practice, name your atlas file
{CHARACTER_ID}-{OUTFIT_ID}- Ex:
Queen-Default.png - Ex:
Suki-Cheerleader.png - Ex:
Suzie-Default.png
- Ex:
- For best practice, name your atlas file
- Click
ReImport (*) - Godot will have to restart to finish this step. Click
Save Scenes, Re-Import, and Restart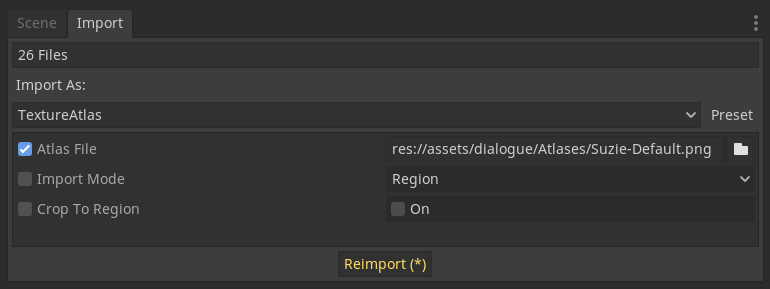
File Path Summary
Outfits
res://assets/dialogue/character/{CHARACTER_ID}/{OUTFIT_ID}
Atlases
res://assets/dialogue/Atlases/{CHARACTER_ID}-{OUTFIT_ID}.png
res://assets/dialogue/Atlases/Queen-Maid.png
res://assets/dialogue/Atlases/MyCharacter-Default.png